一年ぶりの更新となるわけですが、春ですね。
春といえば出会いと別れの季節―― そんな素敵な風景や光景を記憶、そして記録に収めるために写真の存在が欠かせないわけですが、いかんせん容量が馬鹿になりません。
従来は圧縮済画像であれば、Googleフォト上に容量無制限で保存可能であったため、利用されていた方も多いと思います。しかしながら先日、青天の霹靂とも言える発表が。
Googleフォト、写真保存15GBの上限を発表
www.itmedia.co.jp
はいカス~~~ という罵詈雑言はさておき、なんとかGoogleストレージを駆使して画像を保存する方法を3秒くらい熟考した結果、YouTubeに動画として保存 → 写真として利用する際はフレーム毎に分割すればよいという結論に至りました。
寝起きがてらGoogleフォトの代替案を考えてたんだけど、4K解像度で連番動画作成して限定公開でYouTubeにうpするGoogleに喧嘩売るようなアイデアしか思いつかなかった pic.twitter.com/Sr5EjisMg0
— いなにわうどん (@kyoto_mast21) 2021年3月18日
ソースコードはGitHubに公開しています。Python3.x系で動きます。使い方はreadmeみてね
github.com
以下、解説記事となります。
連番写真から4K動画を作る
はじめに、みんな大好き OpenCV を利用して、連番画像を繋ぎ合わせて動画を生成していきます。当初は1フレームずつで実験していたのですが、どうもフレームが不鮮明になる傾向にあったため、2フレームずつ再生することで問題を回避しています。
今回使用する写真はこちら。受験の時の風景豊かな写真群です。

YouTubeは現状8K動画にまで対応しているのですが、特殊なフォーマットの利用が必要、エンコードに膨大な時間を要するといった課題もありますので、取り敢えず4K, H.264で保存しておきました。今後の技術的課題と言えそうです。
import datetime, glob, os
import numpy as np
import cv2
import youtube_uploader
from PIL import Image

# movie
fps = 24.0
width, height = (4096, 2160)
temp_name = "temp.mp4"

# photo
extensions = [".png", ".jpg"]
orientation_exif_key = 274
transpose_no = [0, 3, 1, 5, 4, 6, 2]

# collect files
files = glob.glob("img/*")
codec = cv2.VideoWriter_fourcc(*"avc1")
video = cv2.VideoWriter(temp_name, codec, fps, (width, height))

description = ""

for file in files :
	if os.path.splitext(file)[1].lower() not in extensions :
		continue

	# read an image
	img = Image.open(file)
	description += "%s " % os.path.basename(file)

	# get the EXIF and transpose
	exif = img._getexif()
	if orientation_exif_key in exif :
		orientation = exif[orientation_exif_key]
		if orientation > 1 :
			img = img.transpose(transpose_no[orientation-2])

	# rotate
	rotates = img.height > img.width
	if rotates :
		img = img.rotate(90, expand=True)

	# resize
	magnification = width / img.width if img.width / img.height > width / height else height / img.height
	resized_w = int(img.width * magnification)
	resized_h = int(img.height * magnification)

	img = img.resize((resized_w, resized_h), Image.BICUBIC)
	description += "%s %s %s\n" % (rotates, resized_w, resized_h)

	# make a frame
	frame = Image.new("RGB", (width, height))
	frame.paste(img, (0, 0))
	frame_cv = cv2.cvtColor(np.asarray(frame), cv2.COLOR_RGB2BGR)

	for i in range(2) :
		video.write(frame_cv)

video.release()
print(description)

# upload
now = datetime.datetime.now()
now_str = now.strftime("%Y%m%d-%H:%M:%S")
title = "test-" + now_str

url = youtube_uploader.upload(temp_name, title, description)
OpenCVでも画像処理は不可能ではないのですが、numpyを介して操作する辺り直感的ではないため、画像処理ライブラリである Pillow を利用しています。Pillow↔OpenCVの変換には専用の関数を用いないとサブピクセルの順序が変わる(全体的に青っぽい写真になる)ため注意が必要です(55行)。Pythonは画像処理がお得意。
一般に、動画のアスペクトは16:9が推奨されているため、画像の長辺/短辺が一致するよう適宜回転させます。また、画像の回転情報や画像サイズを、半角スペースをデリミタとするテキストとして、YouTubeの概要欄に書き込んでいます。
加えて、iPhone等のスマートフォンで撮影した写真のExif情報には Orientation タグが含まれており、ここに回転情報が含まれているため、こちらに関しても適切に処理する必要があります(32―37行)。
途中、OpenH264のコーデックがないよと怒られたため導入を迫られました。以下の記事に詳しいです。
完成した動画はこんな感じ。2160p(4K)まで選択可能なことがお解り頂けると思います。
YouTube Data APIを介してアップロードする
Googleの提供する YouTube Data API を利用することで、OAuth2.0の認証フローを介したYouTubeへのアクセスが可能となります。動画のアップロードは https://www.googleapis.com/youtube/v3/videos のエンドポイントに動画のリソースを含んだPOSTリクエストを送ることで実現可能ですが、PythonにはGoogle謹製の便利なライブラリがありますので、そちらを利用することにしましょう。
developers.google.com
はじめに、pipから googleapis/google-api-python-client, google/oauth2client をインストールして、
pip install google-api-python-client
pip install oauth2client
公式ドキュメントやこちらの記事 を参考にして、以下の通り記述します。詳細については割愛しますが、upload(file, title, description) と与えてあげると、アップロード処理を実行します。
import os, sys, time, random
import http.client
import httplib2

from apiclient.discovery import build
from apiclient.errors import HttpError
from apiclient.http import MediaFileUpload
from oauth2client.client import flow_from_clientsecrets
from oauth2client.file import Storage
from oauth2client.tools import argparser, run_flow

httplib2.RETRIES = 1
MAX_RETRIES = 10
RETRIABLE_EXCEPTIONS = (httplib2.HttpLib2Error,
	IOError, http.client.NotConnected,
	http.client.IncompleteRead, http.client.ImproperConnectionState,
	http.client.CannotSendRequest, http.client.CannotSendHeader,
	http.client.ResponseNotReady, http.client.BadStatusLine)

RETRIABLE_STATUS_CODES = [500, 502, 503, 504]
CLIENT_SECRETS_FILE = "client_secrets.json"

MISSING_CLIENT_SECRETS_MESSAGE = """
WARNING: Please configure OAuth 2.0

To make this sample run you will need to populate the client_secrets.json file
found at:
	%s
with information from the API Console
https://console.developers.google.com/

For more information about the client_secrets.json file format, please visit:
https://developers.google.com/api-client-library/python/guide/aaa_client_secrets
""" % os.path.abspath(os.path.join(os.path.dirname(__file__), CLIENT_SECRETS_FILE))

YOUTUBE_UPLOAD_SCOPE = "https://www.googleapis.com/auth/youtube.upload"
YOUTUBE_API_SERVICE_NAME = "youtube"
YOUTUBE_API_VERSION = "v3"


def get_authenticated_service(args) :
	flow = flow_from_clientsecrets(CLIENT_SECRETS_FILE,
								   scope=YOUTUBE_UPLOAD_SCOPE,
								   message=MISSING_CLIENT_SECRETS_MESSAGE)

	storage = Storage("%s-oauth2.json" % sys.argv[0])
	credentials = storage.get()

	if credentials is None or credentials.invalid:
		credentials = run_flow(flow, storage, args)

	return build(YOUTUBE_API_SERVICE_NAME,
				 YOUTUBE_API_VERSION,
				 http=credentials.authorize(httplib2.Http()))


def initialize_upload(youtube, options):
	body = {
		"snippet" : {
			"title" : options.title,
			"description" : options.description,
			"tags" : None,
			"categoryId" : options.category
		},
		"status" : { "privacyStatus" : options.privacyStatus }
	}

	insert_request = youtube.videos().insert(
		part=",".join(body.keys()),
		body=body,
		media_body=MediaFileUpload(options.file, chunksize=-1, resumable=True)
	)

	return resumable_upload(insert_request)


def resumable_upload(insert_request) :
	response = None
	error = None
	retry = 0
	while response is None:
		try:
			print("Uploading file...")
			status, response = insert_request.next_chunk()
			if response is not None:
				if 'id' in response:
					print("Video id '%s' was successfully uploaded." % response["id"])
				else:
					exit("The upload failed with an unexpected response: %s" % response)
		except HttpError as e:
			if e.resp.status in RETRIABLE_STATUS_CODES:
				error = "A retriable HTTP error %d occurred:\n%s" % \
						(e.resp.status, e.content)
			else:
				raise
		except RETRIABLE_EXCEPTIONS as e:
			error = "A retriable error occurred: %s" % e
		if error is not None:
			print(error)
			retry += 1
			if retry > MAX_RETRIES:
			  exit("No longer attempting to retry.")
			max_sleep = 2 ** retry
			sleep_seconds = random.random() * max_sleep
			print("Sleeping %f seconds and then retrying..." % sleep_seconds)
			time.sleep(sleep_seconds)

	# succeeded
	return response["id"]


def upload(file, title, description) :
	argparser.add_argument("--file", default=file)
	argparser.add_argument("--title", default=title)
	argparser.add_argument("--description", default=description)
	argparser.add_argument("--category", default=22)
	argparser.add_argument("--privacyStatus", default="unlisted")
	args = argparser.parse_args()

	youtube = get_authenticated_service(args)

	try:
		return initialize_upload(youtube, args)
	except HttpError as e:
		print("An HTTP error %d occurred:\n%s" % (e.resp.status, e.content))
限定公開として、動画がアップロードされています。
SD→HD→4Kの動画処理が(サーバー上で)完了するまで30分程度でした。

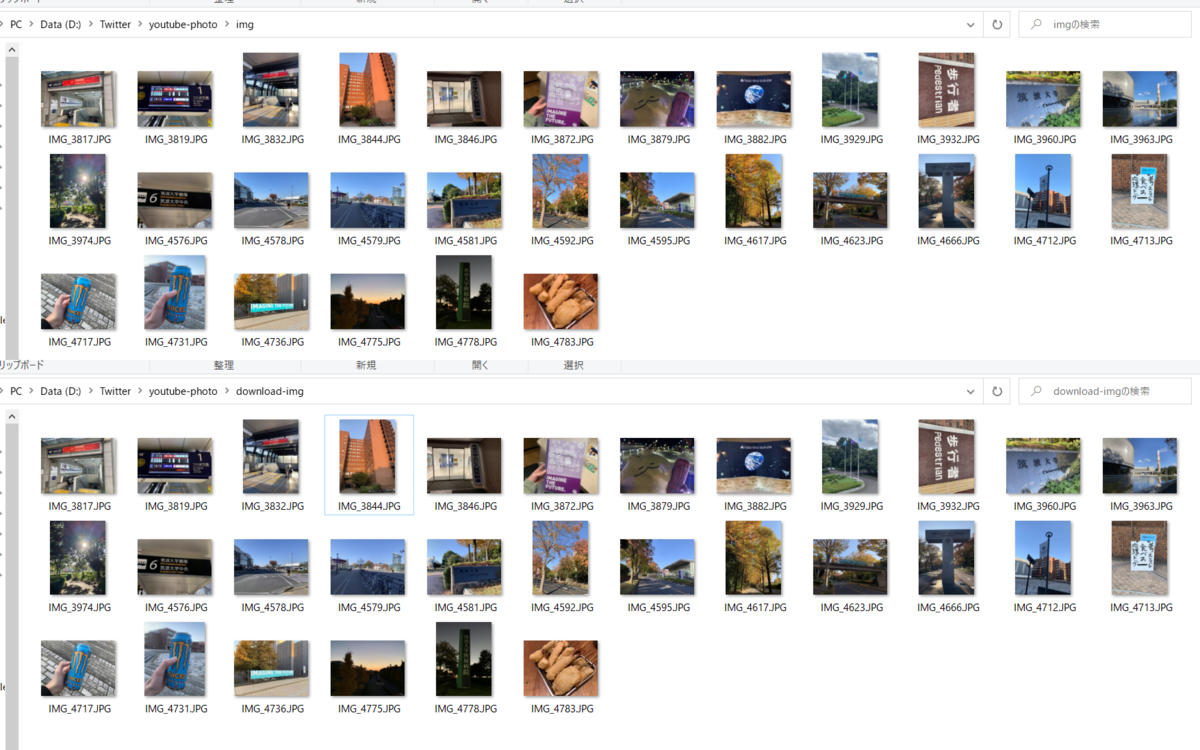
動画をダウンロードする
YouTubeの動画をダウンロードするAPIは公式には存在しませんが、有志の開発する youtube-dl を利用することで対応可能です。例によってpipからインストールして、
pip install youtube-dl
以下の通りに実行します。youtube_dl をインポートし、youtube_dl.YoutubeDL に各種設定を与えます。
今回は、format: bestvide+bestaudio, outtmpl, merge_output_format を与えることで、最高画質の動画をmp4形式で download-temp.mp4 としてダウンロードしています。また、writedescrption: True とすることで、動画の説明文が download-temp.description として別途保存されます。
import sys, glob
import cv2
from PIL import Image
import youtube_dl

video_path = "download-temp.mp4"
picture_dir = "download-img/"
description_pattern = "*.description"
youtube_url = "https://www.youtube.com/watch?v="

movie_width, movie_height = (4096, 2160)

# download a video
urls = [youtube_url + sys.argv[1]]
options = {
	"format" : "bestvideo+bestaudio",
	"outtmpl" : "download-temp.mp4",
	"writedescription" : True,
	"merge_output_format" : "mp4"
}

with youtube_dl.YoutubeDL(options) as ydl :
	ydl.download(urls)
フレームを切り出す
続いて、保存した動画と説明文をそれぞれ開き、動画2フレームに対して説明文を1行ずつ処理していきます。
この際、稀に動画が1フレーム程度飛んでしまうことがあるようで(YouTubeの仕様?)、正確に2フレームずつ処理を進めると画像に欠損が生じてしまいます。今回はハッシュ値を用いて類似度を計算し、既出の画像と比較して、同一画像か否かを判断しています。
pip install ImageHash
適宜画像の回転・切り抜き処理を行い、最終的に元のファイル名に復元して保存します。Pillowはメソッドチェーンの実装があるので便利ですね~~
import sys, glob
import cv2
import imagehash
import youtube_dl
from PIL import Image

video_path = "download-temp.mp4"
picture_dir = "download-img/"
description_pattern = "*.description"
youtube_url = "https://www.youtube.com/watch?v="

movie_width, movie_height = (4096, 2160)

# download a video
urls = [youtube_url + sys.argv[1]]
options = {
	"format" : "bestvideo+bestaudio",
	"outtmpl" : "download-temp.mp4",
	"writedescription" : True,
	"merge_output_format" : "mp4"
}

with youtube_dl.YoutubeDL(options) as ydl :
	ydl.download(urls)

# get a descrption
path = glob.glob(description_pattern)[0]
with open(path) as fp :
	options = fp.read().split("\n")

# capture
cap = cv2.VideoCapture(video_path)
x = 0

while cap.isOpened() :
	ret, frame = cap.read()

	if ret :
		options_line = options[x].split(" ")
		finename = options_line[0]
		rotates = options_line[1] == "True"
		width = int(options_line[2])
		height = int(options_line[3])

		img = cv2.cvtColor(frame, cv2.COLOR_BGR2RGB)
		img = Image.fromarray(img).resize((movie_width, movie_height), Image.BICUBIC)

		# calculate the hash
		img_hash = imagehash.average_hash(img)
		if "before_hash" in locals() and img_hash - before_hash < 2 :
			continue
		before_hash = img_hash

		# crop, rotate
		img = img.crop((0, 0, width, height))
		if rotates :
			img = img.rotate(-90, expand=True)

		img.save("%s%s" % (picture_dir, finename))
		x += 1

	else :
		break
アップロード前 vs ダウンロード後のファイル比較。